

Tail Light Wiring Color Code: 6 Color Codes You Should Know
W hen it comes to the intricate world of automotive safety, understanding tail light wiring color codes is paramount. First things first, let’s talk about why tail lights are more than just shiny ornaments on your vehicle. Tail lights are a critical safety feature in every car, truck, or motorcycle. They serve a dual purpose: illumination and communication. At night or in low-visibility conditions like fog or heavy rain, tail lights are your vehicle’s way of saying,
Generally speaking, the warning system on your car relies heavily on the tail lights. They ensure that other drivers understand your objectives and course of action, improving total road safety.
Understanding Tail Light Wiring Color Code
Now, let’s get into the heart of the matter—the tail light wiring color code. If you’ve ever looked at the spaghetti junction of wires behind your vehicle’s tail light assembly, you know it can be a bit daunting. But fear not! These color codes are actually quite standardized, and once you understand them, they make a lot of sense.
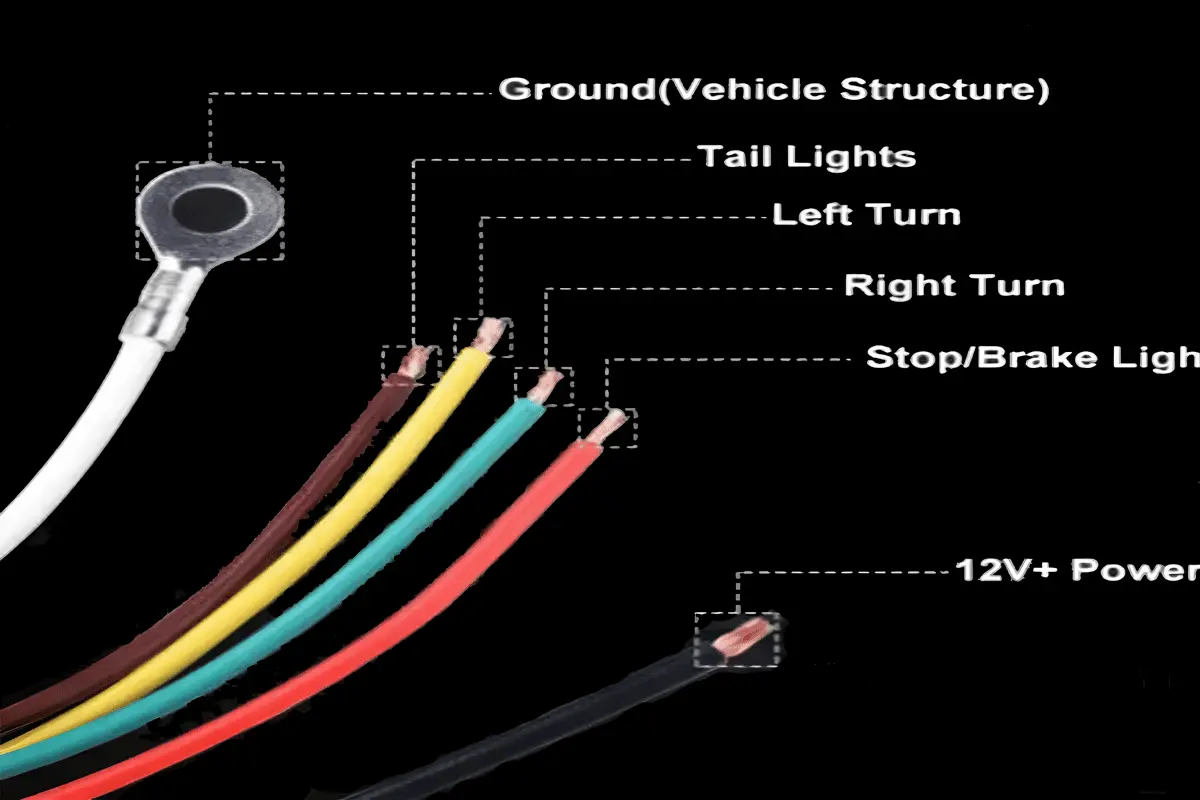
The wiring color code for tail lights is not just random. Each color represents a specific function. For instance, in many vehicles:
- Brown: wires are typically used for tail lights and sometimes for side markers.
- Red: wires often signify brake lights.
- Yellow or amber: wires are usually turn signals.
- White: is commonly the ground wire.
Nevertheless, based on the type and name of your car, this may change. For instance, the stop and turn lights on certain cars may share a wire or have separate color codes. It’s smart to check your car’s manual to find out the exact color code.
Fixing tail light problems requires knowledge of this color code. It’s also helpful for changing or making special changes to your lighting setup. We’ll go further into how you may use these lines for unique tail light replacements and fixes in the next parts.
Which line is positive for the tail light?
You can tell which lines in your tail lights are positive and which are negative by using the tail light wiring color code.
Determining which line goes where is especially useful if you’re adding extra LED or HID lights. The most popular color names for tail light lines are shown in the following chart of tail light wiring color code :
- Brown = Positive
- White = Negative
- Green = Ground
- Red = Breke light
| Color | Function | Common Use | Notes |
|---|---|---|---|
| Brown | Tail Lights | Rear end illumination | Sometimes used for side markers. |
| Red | Brake Lights | Activates when braking | Brightens when the brake pedal is pressed. |
| Yellow | Turn Signals (Right) | Right turn indication | Can be amber; blinks during turn signal activation. |
| Green | Turn Signals (Left) | Left turn indication | Blinks during turn signal activation. |
| White | Ground Wire | Completes electrical circuit | Essential for the electrical system’s integrity. |
| Blue | Reverse Lights | Illuminates when reversing | Activates in reverse gear. |
If this were blue or red/white stripes, your brake lights would not work separately from other parts of your car like danger lights do when power is applied directly through them rather than in an alternate way via another piece of electronics like an ignition switch link. This is used to trigger when hitting the brakes or putting on your warning lights.
Tail Light Wiring Color Code: What Does It Mean?
Typical color codes for well-known auto brands
Though the color coding of tail light wiring may vary somewhat throughout automobile brands, there is surprisingly little variation. Let’s examine it for a few popular automakers:

Toyota and Honda: These two enormous Japanese companies frequently adhere to a quite conventional plan. Usually, the ground wire is either black or white, the tail lights are brown, the right turn signals are green, and the left turn signals are yellow. Typically, a red wire designates brake lights.
Ford and Chevrolet: American manufacturers such as Ford and Chevrolet typically have somewhat distinct color schemes. Keep an eye out for tail lights that are either brown or black, light blue for the right turn signal, dark blue for the left, and often white for the ground. The brake lights are frequently seen in red or pink.
Volkswagen and BMW: With their color coding, European automakers like VW and BMW might surprise you. Wires for ground lighting, turn signals, and tail lights are frequently seen in green or yellow, black or brown, and gray or blue, respectively. Red wiring is frequently used for brake lights.
Keep in mind that these are only suggestions and may change. Before tinkering, make sure you have a copy of the exact wiring schematic for the model of your car.
What Universal Color Codes Usually Indicate
Tail light wire colors are fairly uniform, despite significant variance between brands. Here’s a brief summary of what these hues normally stand for:
Red Wires: Brake lights are almost always connected to red wires. When you step on the brake pedal, they become brighter, alerting oncoming traffic to your lowering speed.
Brown Wires: Typically, brown wires link to the tail lights. When your headlights are on, these lights turn on and give your car a continuous glow at the back.
White Wires: The ground wire is often made of white. This completes the circuit and gives the current a way back to the source, making it an essential part of the electrical system.
Green or yellow: Wires in the colors are frequently used as turn signals (green for left, yellow for right). They blink to let other cars know that you intend to turn.
Blue Wires: When you put your car in reverse, blue wires are often utilized for the lighting.
Any DIY tail light system repairs or alterations require an understanding of these color codes. It facilitates the proper wiring connections and guarantees the security and efficiency of the lighting system in your car.
Comparative Analysis of Tail Light Wiring Color Codes Across Different Vehicle Brands
Understanding how tail light wiring color codes vary among leading vehicle manufacturers.
Vehicle Brand Wiring Variations Table
| Vehicle Brand | Tail Light | Brake Light | Turn Signal (Right) | Turn Signal (Left) | Ground Wire | Reverse Light |
|---|---|---|---|---|---|---|
| Toyota | Brown | Red | Yellow | Green | White | Blue |
| Honda | Brown | Red | Yellow | Green | White/Black | Blue |
| Ford | Brown/Black | Red/Pink | Light Blue | Dark Blue | White | Blue |
| Chevrolet | Brown/Black | Red/Pink | Light Blue | Dark Blue | White | Blue |
| Volkswagen | Black/Brown | Red | Yellow/Green | Yellow/Green | Black/Brown | Blue/Grey |
| BMW | Grey/Blue | Red | Yellow/Green | Yellow/Green | Black/Brown | Blue/Grey |
Notes:
- This table highlights the standard color codes used by various car manufacturers for tail light wiring.
- It’s important to note that there can be variations within the same brand, depending on the model and year.
- Always consult the vehicle’s manual for the most accurate wiring information.
DIY Tips for Tail Light Wiring
Equipment and supplies you’ll require
It’s important to prepare with the proper tools and supplies before you begin fiddling with your car’s tail lights. What you’ll need is as follows:
It is important to have wire strippers and crimpers for any electrical repair on your car. They’ll help you firmly crimp connections and remove the insulation from wires.
Assorted wire connections: Having a range of wire connections on hand, such as spade, bullet, and butt connectors, is a smart idea.
Electrical Tape: To avoid short circuits and protect connections, use high-quality electrical tape.
Multimeter: This useful tool is important for diagnosing electricity problems. It helps with resistance, continuity, and voltage checks.
Soldering Iron: Although it takes some skill to work properly, a soldering iron may be helpful for more durable connections.
Replacement Wires: Ensure that you have an adequate quantity of spare wires, ideally colored differently to stick to the standard wiring color code.
To handle the wire and remove the tail light unit, you’ll need tools and a screwdriver.
Safety glasses and work gloves: First and foremost, safety! When working, keep your hands and eyes safe.
Vehicle’s Wiring Diagram: This is important for knowing the unique wire layout of your car.

Solving Typical Tail Light Wiring Problems
Recognizing and addressing common problems
Investigating taillight problems sometimes mimics detective work. Here are some common problems and solutions for them:
Tail Lights Not Working: In the event that your tail lights are not working, start by checking the bulbs. If the lights are fine, there may be a problem with the wiring, a blown fuse, or a broken link. Look for any blown fuses in the fuse box of your car and repair them if needed. When it comes to wiring problems, look for any broken or loose wires and fix them with the methods covered in the previous part.
Dim or flashing lights: This could indicate a poor connection or a grounding issue. Make sure the links are tightened or cleaned, and look for any loose or corroded leads. Additionally, check the ground wire (which is often black or white) for any broken connections or damage.
One Side Not Working: If your tail lights are broken on only one side, it’s most likely a single-sided problem. Examine the affected side’s links, wires, and bulb. Frequently, the problem is simply a burned-out lightbulb or a loose link.
Turn signs blinking quickly: This is usually the result of a burned-out bulb. Inspect and swap out any broken lightbulbs. If the lights are fine, there may be a wire short or a problem with the flashing device.
Always keep in mind that a voltmeter is your best buddy when it comes to electrical problem analysis. It might help you identify the precise location of the problem.
For a step-by-step guide on Tail Light Wiring Color Codes and more car troubleshooting tips, check out This article How to Fix Car Tail Lights: How to Fix Car Tail Lights
Essential Tools and Supplies for Tail Light Wiring
Equipping yourself with the necessary tools and supplies ensures a smooth and successful tail light wiring project.
Tools and Supplies Table
| Tool/Supply | Description | When Needed |
|---|---|---|
| Wire Strippers and Crimpers | These tools are essential for stripping wire insulation and crimping connectors securely. | Throughout the wiring process. |
| Assorted Wire Connectors | Having various connectors (spade, bullet, butt connectors) on hand ensures compatibility with different wire types. | When making wire connections. |
| Electrical Tape | High-quality electrical tape is used to insulate wire connections and prevent short circuits. | When insulating wire connections. |
| Multimeter | A multimeter is invaluable for diagnosing electrical issues, checking continuity, and voltage testing. | For troubleshooting and testing. |
| Soldering Iron | A soldering iron is used for soldering wires together to create secure and durable connections. | When soldering is required. |
| Replacement Wires | Keep spare wires, preferably in different colors, to match the standard wiring color code. | When replacing or extending wires. |
| Screwdriver and Tools | Various screwdrivers and tools may be needed to access and remove tail light units for wiring work. | When removing or installing tail lights. |
| Safety Glasses and Gloves | Safety glasses protect your eyes, and gloves safeguard your hands during the wiring process. | Throughout the wiring task for protection. |
| Vehicle’s Wiring Diagram | The vehicle’s wiring diagram is crucial for understanding the wire layout and making correct connections. | When referencing the vehicle’s wiring setup. |
Notes:
- These tools and supplies are essential for a successful tail light wiring project, ensuring proper connections and safety.
- Having the right tools on hand makes the wiring process more efficient and reduces the risk of errors.
Chevy Tail Light Wiring Color Codes: An Essential Guide
Decoding the Colors
When working on your Chevy’s tail lights, understanding the wiring color code is crucial. These codes are not just random; each color serves a specific purpose.
Why Color Codes Matter
- Red Wires: These are typically connected to your brake lights. When you press the brakes, they light up, signaling others behind you.
- Brown Wires: Generally, these link to the tail lights. They illuminate alongside your headlights, ensuring visibility from the rear.
- Yellow or Green Wires: These colors are often used for turn signals. They flash to indicate your turning direction.
- White Wires: Usually, white wires are for grounding. They complete the circuit in your lighting system.
- Blue Wires: Sometimes involved in reverse lighting, these wires activate when you reverse your Chevy.
Practical Use of Color Codes
Recognizing these colors aids in DIY tail light tasks, ensuring correct connections for safety and functionality.
Key Takeaway
Grasping the Chevy tail light wiring color code is vital for any repair or modification. It’s not just technical know-how—it’s a step towards safer, more efficient driving.
Additionally, we’ve prepared a downloadable PDF companion to this article, which includes detailed tables, color codes, and essential information about tail light wiring. This PDF resource is designed to assist you in understanding and working with tail light wiring color codes. It also provides valuable insights into common problems and solutions for tail light issues. Whether you’re a DIY enthusiast or simply looking to enhance your knowledge of automotive safety, this PDF can serve as a handy reference guide.
Tail Light Wiring Color Code PDF
conclusion:
In conclusion, maintaining the safety and efficiency of your car’s lighting system requires a grasp of the tail light wiring color code. Because they communicate your location, intentions, and actions to other drivers on the road, tail lights are essential for automobile safety. A standardized method for identifying and troubleshooting wiring faults is provided by the color codes, which include yellow for turn signals and red for brake lights.
To ensure correct connections and safe functioning, do-it-yourself enthusiasts may replace or repair tail light wires by following this complete tutorial. But when it comes to complicated electrical systems, recurring problems, or challenges with legal compliance, it’s crucial to take care and get expert help.
You can guarantee the effectiveness and safety of your car’s lighting system and help make the roads safer for everyone by learning the tail light wiring color code and doing routine maintenance and repairs according to the right procedures.
Understanding Tail Light Wiring Color Codes: A Comprehensive FAQ Guide
-
What are the Standard Tail Light Wiring Color Codes?
- This FAQ would explain the common color codes for tail light wiring, such as red for brake lights, brown or black for tail lights, yellow or green for turn signals, white or black for ground wires, and light green or blue for reverse lights.
-
How Do Tail Light Wiring Color Codes Vary by Vehicle Make and Model?
- This question would address the variations in tail light wiring color codes across different vehicle brands and models, emphasizing the importance of checking the specific manual for each vehicle.
-
Why is understanding tail light wiring color codes important?
- Here, the focus would be on the safety and legal implications of correctly wiring tail lights and the role of color codes in facilitating this.
-
Can Tail Light Wiring Color Codes Differ in Different Countries?
- This FAQ would discuss regional differences in tail light wiring color codes, especially between North America and other regions.
-
What Do the Red Wires in Tail Light Wiring Typically Indicate?
- This question would delve into the specific function of red wires in taillight systems, primarily related to brake lights.
-
How do I identify turn signal wires in taillight wiring?
- An FAQ aimed at helping users identify the turn signal wires, usually yellow or green, in the tail light wiring setup
-
What Should I Do If My Vehicle’s Tail Light Wiring Color Codes Don’t Match Standard Codes?
- This would provide guidance on steps to take if a vehicle’s wiring does not follow the standard color codes, including consulting a service manual or a professional.
-
Are Tail Light Wiring Color Codes the Same for Trailers and Cars?
- This question would compare the tail light wiring color codes for trailers and cars, highlighting any significant similarities or differences.
-
How Can I Safely Alter or Repair My Tail Light Wiring?
- Focused on safety and best practices, this FAQ would offer advice on how to work with tail light wiring, emphasizing the importance of following color codes.
-
Where Can I Find a Diagram of Tail Light Wiring Color Codes for My Vehicle?
- This would guide users on where to find specific wiring diagrams for their vehicle’s tail light system, suggesting resources like service manuals or reputable automotive websites.


